25 September 2013
05 August 2013
Making Babushka Doll Cards - by Stamping T

This week the challenge for the Late Night Stampers Group
is all about ‘Fun Fancy Folds’ for your cards. I love trying out new
and interesting folding techniques for cards but was having difficulty
finding something to share for the challenge that I hadn’t already done
and really was in the mood to create something I hadn’t done before. So
I will spare you the story of how I eventually ended up making these
Babushka Doll fold out cards … let’s just say I was looking for some
Christmas inspiration on line and this is were my head ended up!
Anyway, here is the first little set of girls made using Bermuda Bay
cardstock ….


This is my Pistachio Pudding set of girls …. on reflection a very ‘daze’ look with my punch art eyes LOL! Need to rethink that!


Finally some sweet Blushing Bride girls with the Regarding Dahlias Stamp set for decoration.


I do have this template for sale on my blog on the ‘Tutorials‘
page if you are interested and I have a video for you on some tips for
how you might put these lovely girls together for you here:
http://www.youtube.com/watch?v=BOQtfUvfzYM
Another template with 5 dolls...
![[nesting+doll+template+2.jpg]](https://blogger.googleusercontent.com/img/b/R29vZ2xl/AVvXsEiRT05zhyphenhyphenhq2D3nL9RTDZdQYPdier6vI3dblDaMYeJIbSgADqdCRvQjS8K9dyW3ULbPLaAUXxpT1ZCZackswIPzEYQhM_TNperrQ-Dn-3vj7DmY5CzVO0HVyqSWST1ktEtbYXeEkTO6QNQ/s1600/nesting+doll+template+2.jpg)
25 July 2013
Punched Strawberries
♥

Over thirty years ago I made some little stuffed strawberry Christmas tree ornaments for my mom. After Christmas, she tied them in a bunch and hung them in her kitchen, thus beginning the strawberry collection in her kitchen that rivals my own collection of turtles.
When I saw this Doodlebug paper at the scrapbook store a couple of weeks ago, I just had to have it. Along side of it in the store was a cute little embellishment that I initially picked up, then put back on its hook thinking, "Hmph...I could make that." And I did.

I used a heart-shaped punch for the berry, and then I used my 1/2" corner rounder to soften the point at the bottom. A flower punch served as the leaves, and some white-puffy-paint became seeds.

I used these little berries as embellishments on cards - one for my mom and one for Grandma.
♥
http://paperturtle.blogspot.com/2012/01/strawberry-fields-forever.html
19 July 2013
16 July 2013
Oval Punch Tutorial by Nicole Tugral
TUTORIAL: Oval Punch Bow

SUPPLIES:
Extra Large Oval Punch
Large Oval Punch
Hexagon Punch OR...
Square Punch
Square Punch
1/2" circle punch
3/4" circle punch
Designer Series Paper, I used Afternoon Picnic
Sticky Strip
Large Binder Clip
Large Pearl


TIP: I used sticky strip for a firmer hold. The glue dots work, but I
found that the bow components moved around. I do not have that problem
when using sticky strip. It's not as convenient as the glue dots, but a
much better hold.

DO NOT FLATTEN your ovals as you bend them in half to adhere the ends. You want a rounded bow, not a flat one.


This last picture shows the smaller bow that is made with the Large Oval Punch and the Small Oval Punch. It is hard to tell how big the clip and bow from the tutorial are without a smaller clip next to it.
You can view Nicole's Blog by clicking HERE
'Creped' Paper Flowers Tutorial
Here is a sample card made by Marti, who also produced the above video tutorial...
Kitchen soup is made with all the leftovers and this card is just that. The flower came from a video that I created a few weeks ago and the mosaic background came when I was experimenting with “brayered” embossing folders. So there you have it – my Kitchen Soup Card!

You can see the video on how to make the flowers HERE
To make the mosaic background, I used the Brayer to spread Coastal Cabana classic ink inside the Modern Mosaic Embossing Folder on the positive side. Then I placed the Whisper White cardstock inside the folder and ran it through the Big Shot. I expected to get a solid blue layer of ink in the depressed areas of the cardstock.
I was surprised that the ink was rather blotchy but the more I looked at this pattern, the more I liked it. And then I saw that flowers from the video fit perfectly!
I added the greeting with a wonderful stamp set called “Really Good Greetings“. It has good bold greetings that are easy to use because they can be the focal point of the card. And the sayings are perfect!
Look at the Candy Dot in the Corner! These little dots are so fun to use – no brads required and they come in EVERY color. You definitely need to stock up on these.
13 July 2013
Flower Top Pens
"Tape It" Flower Pens Tutorial
And then I saw a video by Jenny. They are so easy. Check out her video HERE! I did do my flowers just a little different than Jenny did, but you can get the idea by watching her video.
 |
| I made up a bunch of these Flower Pens for some convention gifts. They are so much fun to make! |
 |
| You can see them up close a little better in this photo. |

 |
| I used RSVP pens. You can also use pencils. I'm thinking these would be nice teacher gifts. |
 | ||
| So what do you think? I don't think anyone would walk away with your pen........ |


Here are my color combos:
Calypso Coral
Crisp Cantaloup
Island Indigo
Basic Grey
Coastal Cabana
Strawberry Slush
Pistachio Pudding
Crisp Cantaloup
Baked Brown Sugar
Bashful Bride
Strawberry Slush
Primrose Petals
Cindee Wilkinson's Blog
"Tape It" Paper Flower Tutorial
Happy Saturday!I am sharing with you today the last project using the Tape It stamp set (130715) for the Stampin' Success article. These paper flowers are so pretty and you will be shocked how easy they are to create after you watch the below video I have done for you!
Here is the finished project...

Here is a close up of one of the flowers...
I used Very Vanilla cardstock (101650) and the ink colors I used are:
Summer Starfruit Classic Ink (126991)
Marina Mist Classic Ink (126962)
Wild Wasabi Classic Ink (126959)
Crumb Cake Classic Ink (126975)
The center of the flower has a circle punched out using the 1/2" Circle Punch (119869) and Crumb Cake cardstock (120953). The flower is one of our In Color Dahia's (127556). I stuck it to the flower with two Stampin' Dimensionals (104430) placed on top of each other.
Here is what the back of the flowers look like...
I also strung a few Vintage Faceted Designer Buttons (127555) on to Linen Thread (104199) which I also wrapped around the vase.
by Jenny Peterson - Blog HERE
11 July 2013
Triple Stamping - by Barbara Wirth
Fabulous Florets with Triple Time Stamping
My friend, Barbara Wirth, made this card
for her daughter-in-law. I thought that it was so beautiful, I asked
her if I could take a picture and share it with all of you.
You can click here to Download Triple Time Stamping directions.
- The card base is Crumb Cake and the layers are Very Vanilla.
- The flowers are stamped in Pool Party, Real Red, Crumb Cake, Old Olive, and the white flowers are embossed.
- Barbara sponged all of the vanilla card stock with Crumb Cake to give the card a very warm feel.
Triple Time Stamping -Blooming with Kindness Stampin' Up! Stamp Set
1. Fold the Elegant Eggplant card stock in half.
2. Add the white insert for inside.
3. Lightly adhere the three pieces of white card stock together with just one
little bit in the middle of the back of each piece.
4. Stamp the greeting of your choice in the center of the smallest white card
in Eggplant ink.
5. Then stamp the large flower on all four corners. Position the stamp in
different directions.
6. Layer the top four layers.
7. Cut 12" of Eggplant Dotted Scallop Ribbon and tie it around those layers.
8. Add these layers to the final white layer and then add these to the main
card.
Sizes of Layers:
White Eggplant
2"x 3 1/4" 2 1/4"x 3 1/2"
3"x 4 1/4" 3 1/4"x 4 1/2"
4"x 5 1/4" main card
Decor Framelets Card - A DOUBLE challenge by Connie Babbert


- I cut TWO of the largest Decor Label Framelits from Pistachio Pudding cardstock.
- The FRONT one I embossed with Perfect Polka Dots folder. The BACK one I scored across right at the part where the top design starts to turn into the curved shape. Use Sticky Strip above the scored mark on the BACK one, then adhere front and back together. The scored line becomes the hinge to open and close the card.
- Stamp the greeting from hostess set, Simply Sketched in Calypso Coral on Whisper White, then cut with the smaller Decor Label Framelit and adhere to front.
- Stamp the Flower Shop flower image twice with Crisp Cantaloupe ink on Whisper White and punch with the Pansy Punch. Also punch one Blossom punch from Calypso Coral cardstock. Adhere to the front with Stampin' Dimensionals.
- Cut a 1" x 6" strip of Crisp Cantaloupe pattern from In Colors Designer Paper Pack and fold in half, cut flag ends. Tuck under the left side of the larger flower.
- Punch the Itty Bitty flower image from Pistachio Pudding pattern in the In Colors Designer Paper Pack and use for the centers of the flowers. Add a Calypso Coral Candy Dots in the center.
You can view Connie's blog
24 June 2013
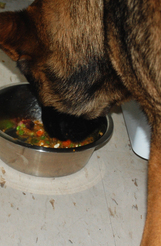
Dog Food - Make your own recipe
Free Homemade Dog Food Recipe: Beef and Sweet Vegetables
04/30/2013 -
http://www.k9instinct.com/1/post/2013/04/free-homemade-dog-food-recipe-beef-and-sweet-vegetables.html
http://www.k9instinct.com/1/post/2013/04/free-homemade-dog-food-recipe-beef-and-sweet-vegetables.html
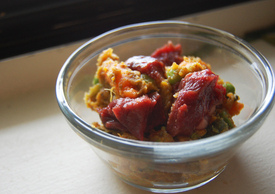
A homemade dog food diet is an excellent, healthy alternative to commercial kibble. Homemade dog food
can help promote health and well being in your four-legged family
members by providing real food, wholesome nutrition and freshness you
simply cannot get with kibble diets. Making your own dog food is easier
than you think, and can also be quite inexpensive! Purchasing your meat
on sale and buying bagged frozen vegetables will be cheaper than buying a
high quality kibble!
This free homemade dog food recipe is balanced and complete to AAFCO (Association of American Feed Control Officials) standards. A complete whole food multivitamin is ESSENTIAL to every homemade recipe to replace any nutrients lost in the cooking process. To get my entire collection of balanced homemade dog food recipes, check out my Homemade Dog Food Recipe eBook!
This free homemade dog food recipe is balanced and complete to AAFCO (Association of American Feed Control Officials) standards. A complete whole food multivitamin is ESSENTIAL to every homemade recipe to replace any nutrients lost in the cooking process. To get my entire collection of balanced homemade dog food recipes, check out my Homemade Dog Food Recipe eBook!
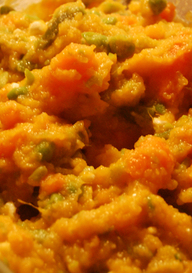
Beef and Sweet Vegetables
INGREDIENTS
DIRECTIONS
INGREDIENTS
- 550g boiled beef liver
- 1 cup unsweetened applesauce
- 1 cup of boiled sweet potato
- 1/2 cup of boiled green beans
- 1/2 cup of boiled peas
- 1/2 cup of boiled carrots
- 1/4 cup of 2% fat cottage cheese
- 2 tablespoons of extra virgin olive oil
- 1 1/2 scoops of Nupro Gold Supplement
DIRECTIONS
- Chop the beef liver into small pieces and boil until cooked. (Do not overcook!)
- Boil sweet potato, green beans, peas and carrots until tender.
- In a large bowl add the sweet potato, green beans, peas, carrots, applesauce, cottage cheese and extra virgin olive oil. Mash it all together and mix well.
- Add the boiled beef liver to the mash, mix it in.
- When the food cools, add 1 1/2 scoops of the Nupro Gold supplement.
- Serve!
 FEEDING GUIDE FOR THIS MEAL
- 10 lbs - 208g a day
- 20 lbs - 350g a day
- 40 lbs - 589g a day
- 60 lbs - 798g a day
- 80 lbs - 991g a day
- 100 lbs - 1172g a day
Conversion for grams to cups:
Conversion Chart / Table
| gram to cups Conversion Chart / Table: | cups to grams Conversion Chart / Table: | ||
| g = c
1.0 = 0.00423 2.0 = 0.00845 3.0 = 0.01268 4.0 = 0.01691 5.0 = 0.02113 |
gram
= cups 6.0 = 0.02536 7.0 = 0.02959 8.0 = 0.03381 9.0 = 0.03804 10 = 0.04227 |
c = g 1 = 236.58824 2 = 473.17647 3 = 709.76471 4 = 946.35295 5 =1182.94118 |
cups = grams 6 =1419.52942 7 = 1656.11766 8 = 1892.7059 9 =2129.29413 10=2365.88237 |
Want more balanced and complete recipes? Check out my eBook: Homemade Dog Food Recipes
Don't forget to like K9 Instinct on Facebook to get new blog article updates and other dog tips!
Angel
K9 Instinct
www.k9instinct.com
Subscribe to:
Posts (Atom)