30 October 2010

Snowman Ornament


Supplies Needed:
*All punches listed are Stampin' Up!

1 3/4" Circle punch - SNOWMAN BELLY
Ornament - HEAD
Small Oval punch - BOOTS
Medium Oval Punch - BOOTS & MITTENS
Modern Label - ARMS & LEGS
Large Oval Punch - HAT BRIM
Scallop Oval Punch - HAT BRIM
Full Heart Punch - HAT
Word window Punch - MITTEN CUFFS
Small Heart Punch - MITTEN
Boho Blossoms Punch - HAT
White cardstock (I used shimmery white)
Black cardstock for boots
Patterned papers for mittens and hat
Ribbon of choice for scarf
Peachy Keen Winter Faces 1 1/8" stamp set
black ink pad
pumpkin pie marker
pink pirouette ink pad and sponge dauber
glue, dimensionals, crop-a-dile, bone folder, 1/8" taffetta ribbon or cording

1) Punch out 16 white 1 3/4" circles. Fold each circle in half. Use a bone folder to sharpen the folds.

2) Start with the first circle folded in half. Put adhesive on the top side and attach another circle half to it. (I recommend applying adhesive to the centers of the circles. This way, the edges will be open and you can slip the head, arms and legs between the layers)


3) Continue to glue and stack the circles together, adding only adhesive to the top of the stack. After gluing all of the circles together, you will have a stack like this.


4) When you take your finger off the stack, it will naturally want to fan out like this.


5) Glue the ends of the fan together to form a ball. This is the snowman's belly piece.

6) Punch out 4 modern labels. Glue these onto the bottom and sides of the snowman for the arms and legs. (if you glued only the centers of the circles, the edges will be open and you can slide the arms and legs between the layers). You may have to clip a little off each end of the label to get the legs and arms positioned properly.

7) For the mittens, punch 2 medium ovals, 2 small hearts and one word window. Cut the word window in half and round out the end on each half to form the cuffs. Glue the cuffs onto the bottom of ovals. Glue the heart onto the back of the mitten for the thumb. Attach mittens to arms with dimensionals.


8) Punch 2 black small ovals and 2 black medium ovals. Cut each end off of the small ovals so that the total length of the piece is 5/8". Glue onto end of leg. Cut the bottom off of medium oval and attach to foot with dimensional. Add highlight with white gel pen.

9) Punch a white ornament. Stamp the face, color the nose and add pink cheeks with a sponge dauber. Apply some glue to the neck of the ornament and slip it between the top layers of the ball (this is where the tip in step 1 comes in handy).

10) For hat brim, first punch half of the large oval. Then, line up the scallop oval over the top of that punched hole and punch the brim. Glue the full heart onto back of head. Attach brim of hat with dimensional. Clip the ends of the small oval to form a point for the hat. Attach with dimensional. Punch a boho blossom and attach to hat (you may want to add glitter to the tassle).

11) Punch a hole in top of hat and tie on a ribbon or cording for a hanger.


My thanks to Kim Score for this fabulous tutorial.

25 October 2010

Modifying the Scalloped Envelope Die to hold Gift Cards

Modifying the Envelope die to hold Gift Cards


I posted this about a year and a half ago... instructions on how to modify our darling Stampin' Up! Scalloped Envelope Die (cut out with the Big Shot) to hold a GIFT CARD...


With the holidays upon us, we are all looking for cute ways to give a gift card, so I thought you might like to view this post again. enjoy!

Env 8

Env 9

SCALLOPED ENVELOPE DIE, item #113462, pg 206 Stampin' Up! Catalog


step 1: start with a 6x6 piece of DSP

Env 1

step 2: fold it in 1/2

Env 2

step 3: align the folded edge with the 3rd scallop down on the die

Env 3

Env 4

step 4: run it through the BIg Shot machine


step 5: open up the envelope and burnish out the fold/crease with the Bone Folder

Env 5

step 6: seal the edges shut with Sticky Strip and you have an envelope sized to fit a Gift Card!

Env 6

Env 7

Env 8

SCALLOPED ENVELOPE DIE, item #113462, pg 206 Stampin' Up! Catalog


Order Supplies online anytime! CLICK HERE TO PLACE YOUR ORDER.


Thank you Patty Bennett for these instructions, as always. Here is Patty's Stamping Spot


These Instructions Page


02 October 2010

Snow People

The card features the new face set called Snow Cuties (PK-500 & PK-501). Instructions for making this card is below the blog hop button. I'm also excited that my design is one of the new CottageCutz dies called Herby. You can see him HERE. There are so many other AWESOME new halloween dies. You just have to see them all HERE.

[PKS = Peachy Keen Stamps ( PKS Snow People Faces Stamps )


INSTRUCTIONS:
All punches used are Stampin’ Up!
(sorry, the pictures look a little "yellow", not sure what happened)


Snowboy:
Punch 2 1/2” Circle, 1 3/4” Circle & Ornament in textured white.
For arm, punch half of the Medium Oval, then line up the Large Oval over the top of the punched hole and punch the arm as shown. Round out the sharp edges of the punched arm. Punch 3/4” Circle for one hand.

Punch 1 1/4” Square in black, Word Window in black and one third of the 1 1/4” Square in a color of choice for the hat band. Use the Crop-a-dile to punch 3 of the smallest circles for the holly berries. Cut 2 small rectangles. Use a 1/4” circle and punch around the outer edges to create the holly leaves. Punch 3 of the 1/4” Circles for buttons and the smallest heart from Heart to Heart for the chest.

Stamp the snowboy face onto the ornament using the Snow Cuties 1 1/8” stamp (PK-501). Sponge the edges of the white pieces with soft sky ink. Attach the 1 3/4” Circle at the top of the 2 1/2” circle with dimensionals. Attach the head to the body with dimensionals. Glue hat band onto hat. Clip away a little on each side at an angle so that the square is narrower at the bottom. Attach the word window onto the square with dimensionals. Glue holly leaves and berries onto hat. Attach hat to head with dimensionals. Attach arm and heart with dimensional. Glue on buttons.

Snowgirl:
Punch 1 3/4” Circle, 1 3/8” Circle & 1 1/4” Circle in textured white.
For arm, punch half of the 3/4” Circle, then line up the Small Oval over the top of the punched hole and punch the arm like you did for the snowboy. Round out the sharp edges of the punched arm. Make 2 arms.

Stamp the snowgirl face onto the 1 1/4” Circle using the Snow Cuties Assortment stamps 1” size (PK-500). Sponge the edges of the white pieces with soft sky ink. Attach the 1 3/8” Circle at the top of the 1 3/4” circle with dimensionals. Attach the head to the body with dimensionals (tilt the head towards the snowboy). Attach the arms and heart with dimensionals. Attach snowgirl to front of snowboy with dimensionals. Attach snowboy hand onto snowgirl shoulder with dimensional.

Card Assembly:

For the basic card assembly, follow the instructions for a Tent Card in the SCS Resources Section HERE. For card base, cut 5 1/2” x 11” baha breeze cardstock. For inside of card, cut 5 1/2” x 4”. I used a retired Stampin’ Up! DSP called Ski Slope. The new Stampin’ Up! DSP called Candy Cane would be a great substitute. Cut striped paper for the front 5 1/4” x 5 1/4”. Cut snowflake print for inside 5 1/4” x 5 1/4”. I used the Nestabilities Petite Circles (largest) and the Nestabilities Scallop Circle (largest) for the window on the front. The greeting from SU! Bright Christmas is stamped in real red and cut out with the Nestabilities Mega Ovals. You can’t see in the picture, but the words are outlined with a stardust pen to add shimmer. Card is embellished with the SU! Red satin ribbon.


The Tent Card Instructions, from Splitcoaststampers site:


Tent Card

by Beate Johns

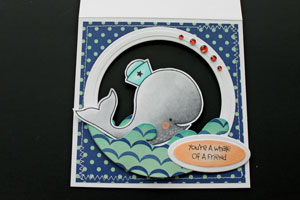
Create a standing card with a window.

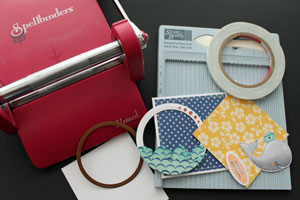
Supplies

  • One 4 1/4" x 8 1/2" piece of cardstock

  • One 4 1/4" x 4" piece of cardstock, for the card stand

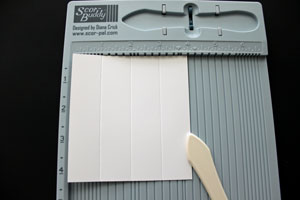
  • Scor-Buddy™, or other scoring tool

  • Scor-Tape™, or other strong adhesive

  • Two 4" squares of patterned paper, (October Afternoon's Seaside used here)

  • Wizard™, or other die cut machine

  • Shape dies, (Classic Circle Nestabilities™ used here)

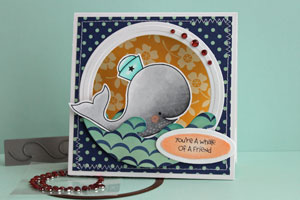
  • Stamps, (The Cat's Pajamas A Whale of a Time used here)

Step-by-Step

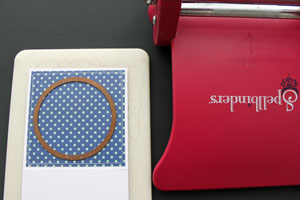
  1. Step 1

    Adhere one of the 4" patterned paper squares to the front of the card (optional).

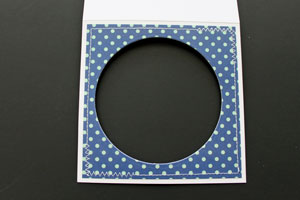
    Unfold the card and place the shape die on the card front.

  2. Run opened card with die through the die cut machine to cut a window.

  3. Step 2 (Optional)

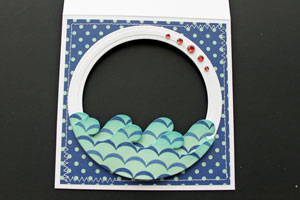
    Adhere a frame around the window.

    Hint:
    Cut the window on the card one size bigger then the opening of the frame. (The frame was cut with two Classic Circle Nestabilities™.
    The waves were cut with The Cat's Pajama's wave die.)

  4. Step 3

    Stamp, color and cut out an image. Adhere or suspend it from the window.

  5. Step 4

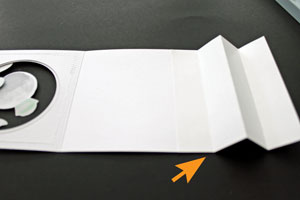
    Score the 4" x 4 1/4" piece of cardstock at 1", 2" and 3" on the 4" side.

  6. Step 5

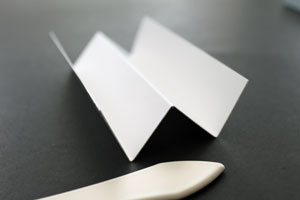
    Fold the score lines in mountain/valley style. The center fold has to go up (mountain), the two outer folds have to face down (valley).

  7. Step 6

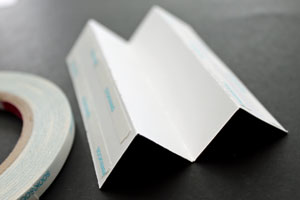
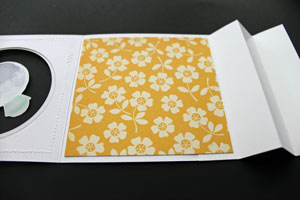
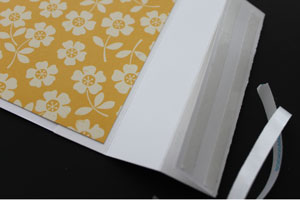
    Apply adhesive to the outer panels.

  8. Step 7

    Line up the first fold of the folded cardstock with the bottom of the back of the card.

    Hint:
    Make sure the second fold of the folded cardstock piece will point up.

  9. Step 8

    Adhere the second 4" square of patterned paper on the inside of the card.

  10. Step 9

    Remove the adhesive liner on the other edge of your folded cardstock.

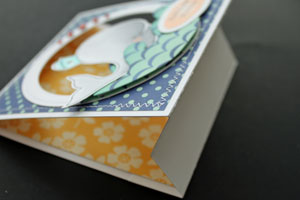
  11. Adhere the bottom of the card front to the edge of the fold of the card bottom.

  12. Step 10

    Your tent card is done.


17 September 2010

13 July 2010

Moose With Babies in Back Yard Water Sprinkler

I was pointed to this video clip this morning, and want to pass it along. Nothing can beat Mother Nature... thank you God.


Steve Goddard's video

04 May 2010

Bloomin' Beautiful Crimping Tutorial

Thank you Lee Conrey from Stampingleeyours

I finally had a few minutes to do a tutorial on this card. This card features “Bloomin Beautiful” from Stampin’ Up! I’ve had so many requests to share this so I hope you enjoy it.


image

Finished Card


Crimping Technique………………….

First you need a piece of card stock measuring 4’ x 5 1/4”…you will need to have this piece marked on the center edge of all sides as seen below. The center is 2” on the short sides and 2 5/8” on the long sides. Mark with pencil so you can erase

clip_image002

Then you want to score from a long side to a short side as seen here marked by a broken line (dashes).

clip_image003

and score….

clip_image004

Once you have scored it you will need to fold it in… like this;

clip_image005

then you will place it folded into your crimper… as shown below

clip_image006

try and keep it folded

clip_image007

Run it though the crimper and don’t despair when it hasn’t totally crimped in the center. Simply open and crimp again from both sides to the center to get full crimped coverage.

clip_image008

like this….

clip_image009

do this from both sides to fill in the center and you’re done!!!! Now that wasn’t hard was it?


Now to get the cute little diamond shapes for the inside of the center…I crimped another piece and cut the center out (large diamond) and cut it down to where I wanted it. Make sure to cut equally on all sides to make your templates and then trace to cardstock. That’s it!!!


03 April 2010

Brayering and Sponging Technique

Saturday, April 3, 2010

Tutorial: Capture the Waves… Brayered and Sponging Surfer

You asked for it… and I finally had time to dedicate to recreating the Brayered and Sponged Surfer Card which I posted back on March 13th HERE.

March 2010 080

The good news is… this card was as much fun to create the second time as it was the first! I hope you’ll try the technique, and enjoy it as much as I have! And, I have to thank my wonderful teacher (again)… Michelle Zindorf.. you rock!!

Supplies -complete list at end of tutorial…

swaps 058

First things first, you will want to protect your work surface with a pad (or couple sheets) of grid paper!

Next, load up your brayer with Barely Banana Classic Ink. Beginning OFF the cardstock, quickly brayer across the corner towards the middle diagonal of the card stock. Repeat until desired depth of color has been achieved.

swaps 005

Ink up your brayer with Apricot Appeal Ink and repeat the corner to diagonal brayer process. Do this only ONCE.

Next, use 1/8 of a stampin’ sponge and ink with Apricot Appeal Classic Ink. Gently pounce the inked corner to add color. Use a circular motion to create a sun-like image.

swaps 012 Continue pouncing and sponging, adding color along the cardstock edges closest to the brayered corner.

Now, take two layers of post-it notes, and form a diagonal from the center of the brayered, across the card stock. swaps 013

Ink up a fresh 1/8 piece of sponge with Bashful Blue Classic Ink, and gently scrub across the edge of the post it note. (Lift the post it note and peek to make sure the color is what you want before completely removing the post it note.)

swaps 014

Repeat this process to add additional diagonal rays of color. This picture shows two rays.. but I actually added three.

swaps 022

Take two fresh post it notes (leave them stuck together) and tear a jagged edge along the sticky edge of the note. Turn your work sideways, and attach the post it note so that the brayered part is protected.

swaps 024 Ink up your sponge with Bashful Blue Classic Ink, and lightly scrub across the torn edge to add color. Then move post it note UP approximately 1/8” and scrub sponge inked with Not Quite Navy Classic Ink across the jagged edge. This will form your horizon line. swaps 028

Working in the other direction, you will now move the post it note DOWN, approximately 1/8” to 1/4” at a time and sponge with Bashful Blue Classic Ink. Move the jagged edge right and left, and sometimes angle it to give your surf an uneven and realistic appearance.

swaps 029

Now you will repeat this process several times alternating Bashful Blue Classic Ink, Not Quite Navy Classic Ink, and occasionally Tempting Turquoise. Each time you will vary the positioning of the post it notes, ink wider lines, aligning on an angle, and/or leave gaps of white (caps) between the inked lines.

swaps 030

Repeat this process until the entire lower half 003of the card stock is filled with your waves.

swaps 039 Ink the sponge with Not Quite Navy Classic Ink, and pounce, rub a splash of water on the upper right edge.

swaps 040

Ink the Extreme Surfboard Image with Basic Black Classic Ink, and add to upper right corner of card stock, and then use a Signo White Gel Pen to add random splashes to the water surrounding the surfer image.

swaps 044

Note: if your surfer image is not as dark as you would like, use a re-inker (or the lid of your basic black classic ink pad) an an aqua painter to fill in the missing or lighter areas.)

Use a sponge or sponge dauber to darken the edges of the card stock with basic black classic ink. And next, you will simply add glue to the white areas of the waves, and sprinkle with dazzling diamonds!swaps 055

Assemble with coordinating card stock colors, and you’ll have a beautiful one of a kind card!

March 2010 081Hope you enjoyed my tutorial, and I’d love to see your creations too! I will be teaching this card during techniques classes in April, hope you’ll join us. Check out my Stampin’ Up! Events Calendar Here for more information

Stampin’ Supplies Used on Today’s Card:

Stamps: Extreme Surfboard #115173 $8.95

Classic Inks@ $5.95 each:

  • Not Quite Navy #103008
  • Bashful Blue #105209
  • Tempting Turquoise #100814
  • Barely Banana #101170
  • Apricot Appeal #105218

Accessories:

  • Brayer (soft rubber) #102395 $12.50
  • Stamping Sponges #101610 3qty $3.95
  • 2-Way Glue Pen #100425 $3.50
  • Dazzling Diamonds #102023 $4.50
  • Whisper White Card Stock #100730 40sheets $7.50
  • Grid Paper #102787 (100 sheets) $9.95
  • White Signo Gel Pen @105021 $3.95
  • Post-It Notes

From: Sharon Field